Center Panel

Saturday, March 19, 2022

Altenew Scene Building


  `I approached this class with trepidation after seeing the examples

from several classmates. I have only recently

started my Altenew Stamp and Die collections and was 

concerned that I might not have sufficient supplies. But after 

giving it some thought I realized I could use some of the 

techniques from the Art Impressions classes I have been taking

and I was quickly able to put together a scene that I liked. 

An idea then occured to me which I thought would be unique

as well as make up for my limited supplies.

I used an acetate sheet to make the card base and adhered

the scene layer to the acetate base using Altenew

Double Sided Ahesive Sheets so that it would have a clean

appearance and then used small dots of glue to add 

the die-cut layer to the front to act as a door way

into the garden depicted on the inside layer.

 The sentiments are stamped on vellum and heat

embossed using Silver and Green to match the lattice layer


The cherry blossom branch and birds are stamped from the Altenew 

        Under the Cherry Blossom Tree stamp and die set, and are colored 

  using Warm Grey and Red Cosmos Altenew Crisp Dye ink cubes. 

 The butterflies are from the Altenew Painted Butterflies set and 

colored with oranges from the Golden Sunset Crisp Dye inks.

             The squirrels and grass clumps are from an Art Impressions stamp set

and were colored from the Warm Grey Crisp Dye inks

After making the scene using smooth cardstock I decided to make 

a second version with watercolor paper so that I could enhance 

the background.


Friday, March 18, 2022

Altenew Shine Card Class Entry

I recently watched a Ken Oliver youtube where he demonstrated the use of Emossing Paste to add foil to cardstock without using heat tools. The process uses Tacky-when-Dry Gel Medium. The gel is spread on cardstock and allowed to dry. The foil paper is then pressed over the area and burnished. When I watched that demonstration I knew I wanted to try that technique for the Altenew SHINE class.


After a few tries I realized I wasn't going to reach perfection with the foiling technique. My remedy was to make another copy using the Forest Glade Altenew Crisp Die Ink Cube and cut a piece to match the design of the foiled one and connect


After matching the designs I cut and adhered them to the front of a dark green A2 card front


While searching for my glue dots I came accross a roll of gold foil tape and realized this 
would make a wonderful addition to the sentiment while adding even more SHINE
to the strip sentiment from my Sentiment Stack set.


Monday, March 14, 2022

ALTENEW IRRESISTIBLE INKING TECHNIQUES

      I took inspiration from Lesson 4, 

"Brayers and Inkpads". 


The Green bottom layer was made with a brayer.

I used a small brayer and Altenew Forest Glade 

Crisp Dye Ink to color the bottom layer and inked

the sides using that ink cube also.


I next used Coral Berry to "scrubble" the pink layer

and also to ink the sides.


Next, using the brush flower and leaf from
the Embroidered Blooms stamp set, I used 
Jet Black StayOn ink so that I could 
watercolor without smearing the outline.
As you can see I didn't quite 
match the flower to the stem. 


I made up for that mistake by using the ink
cubes as water colors and painted 
in the connection.
I used frayed leaf to color the stem and leaf
and Coral Berry for the flower.

After stamping the sentiment
all layers were adhered
to a slim line white card base.

Despite having injured my back
shoveling snow I truly enjoyed
working on this card.
instead of cleaning my craftroom
as I had planned ! LOL


Monday, March 7, 2022

Altenew "FOR THE GUYS" Geometrics


 I have been anxiously awaiting this class so that I could

 finally use my new Altenew Halftone Squares stamp set.

It took me a little bit to get the hang of patterning but I took

inspiration  from the examples in the stamp pack.


After stamping the pattern using a variety of Ranger mini cube inks

 I cut the design into a 5"x 2 1/8" strip 

and then cut that into three pieces.

Two were used on the card front and the leftover piece was

placed on the inside , both as decoration and to support the card front


As shown in the demonstration video I temporarily 
placed the pieces on the card front so I could determine 
how to place the sentiment


I then placed pencil markings so that I 
could remove the design pieces and stamp
without fear of misplacement.
The sentiment is from the Altenew Brushed Lettering
stamp set.


As you can see I am continuing to use the
ink splattering. In this case it was used to
cover up some random spots that appeared
from the sentiment stamping.


After heat embossing the sentiment using black
embossing powder I adhered the design pieces 
using strips of foam tape.


Thanks for visiting this blog and I would so appreciate
your comments and suggestions


Saturday, March 5, 2022

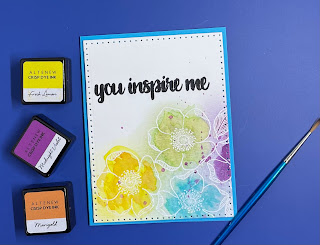
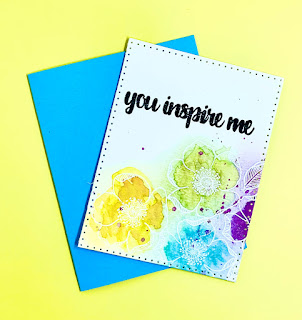
Altenew Easy Inkblending Techniques/Faux Watercoloring


Every time a take an Altenew Class the card I make from that class becomes my favorite. 

But the card I made today is truly my favorite. 

I'm sure I will be using the Faux Watercoloring technique often.


Using  flower stamps from the Lush Garden Project Kit I embossed
them using white embossing powder and then used Fresh Lemon, 
Marigold, Midnight Violet, and Persian Blue ink from the mini cube  
inks to lightly watercolor them.


                      Next, after stamping several Distress Mini Cube inks on my glass
                   mat and adding water, I used those colors to add depth to color
                                                           of  the flowers                                                                                                                                                                                                                       


Using my Misti stamping tool I stamped the sentiment


After using a dotted rectangle diecutting to cut 
the card front to fit an A2 size card 
I adhered that to a piece of craft foam.

I also used my newly improved spatter technique but because I used
a large brush my spatters are a bit larger than I would have liked.

                                        
This was a fun and easy card to make but has quite a WOW factor !


Thursday, March 3, 2022

Altenew Easy Die Cutting Techniques


Once again I was able to make my card using the same stamp set used in the class demonstration. However I did not have the same die. I used the Altenew Stacked Diamonds Cover Die for the blue embossed layer and was very pleased with the result.                          

I decided to go for a (mostly) monochromatic effect and used Altenew Glacier Caves Mini Cube inks to color the flowers and the Altenew Green Fields mini Cubes for the leaves.


I love learning ways to expand my craft supplies by finding ways to use the supplies I already have in different ways. It never hurts to save money (to buy more craft supplies of course)!